How to use Barcode Professional in Reporting Services 2000 - Product List sample
Product Barcode Professional for Reporting Services Published 05/01/2007 Updated 05/01/2007
Requirements
Neodynamic Barcode Professional for Reporting Services
Microsoft SQL Server Reporting Services (any version)
Microsoft .NET Framework 1.1 or greater
Microsoft Visual Studio .NET 2003 or greater
Due to its flexible design, Barcode Professional allows you to show barcode images in Microsoft SQL Server Reporting Services reports. You can use all Barcode Symbologies - Linear & 2D - built-in Barcode Professional.
In the following sample we're going to create a Reporting Services report which shows barcode images into it using Barcode Professional and Visual Studio .NET.
In this sample we're going to create a Reporting Services report to create a Product List from Microsoft's Northwind database sample.
Follow up these steps
- Open Visual Studio .NET and create a new Report Project.
- In the Solution Explorer, click on Report > Add > Add New Item... and in the Add New Item dialog box select the Report icon and call it ProductList.rdl. Then click OK
- Add a new Data Source from the Solution Explorer clicking on Shared Data Sources > Add New Data Source. If you have the Northwind Database installed in a SQL Server select it.
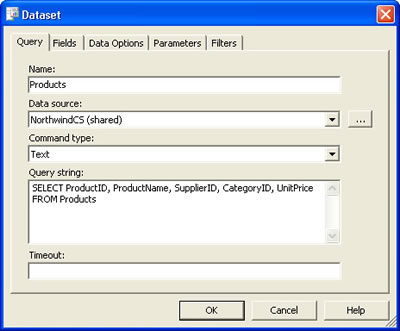
- In the Data tab of the Report designer, add a new DataSet as is shown in the following figure.
-
In this sample we're going to use the Industrial 2 of 5 Barcode Symbology, but remember that you can use ANY Barcode Symbology.
Follow these steps:- Install Barcode Professional for Reporting Services so it can be used with it. Please, see the Installation and Configuration topic in the Barcode Professional for Reporting Services documentation.
- In VS.NET and with the report opened at design-time, add a reference to the Barcode Professional assembly (Neodynamic.ReportingServices.Barcode.dll) going to Report > Report properties... Add the reference as is shown in the following figure:
Note that the assembly version could be different from the image depending on the Barcode Professional for Reporting Services version installed on your machine.
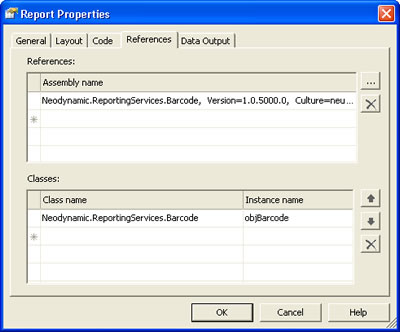
We'll need to create an instance of Barcode Professional to use it then in a custom function. To do this, add a new entry in the Classes grid as is shown in the following figure. Note that the instance will be called objBarcode and that the full reference to the class is Neodynamic.ReportingServices.Barcode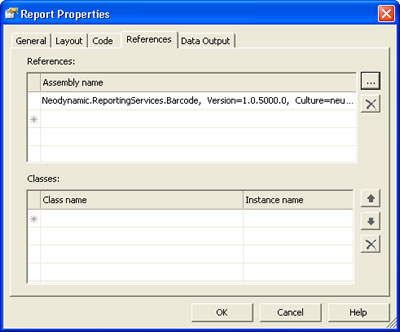
- Finally, we're going to create a VB.NET function which will be invoked to get the appropriate Industrial 2 of 5 barcode image using the Barcode Professional instance created in the previous step. In the Code tab write the following code:
IMPORTANT: If you are using Barcode Professional 3.0 or greater, then modify the line objBarcode.BarHeight = 20 in the function below to objBarcode.BarHeight = 0.2 because in those new versions all barcode-related dimensions are measured in inches instead of pixel!
This VB.NET function called GetBarcode requires a code parameter. This value will be specified with some fields of the DataSet in the Data Source report. And as you can see in this function you can set any property of Barcode Professional.Public Function GetBarcode(ByVal code As String) As Byte() 'Set the value to encode objBarcode.Code = code 'Set the Industrial 2 of 5 Barcode Symbology objBarcode.Symbology = _ Neodynamic.ReportingServices.Symbology.Industrial2of5 'Set the Bar's height to 20 px objBarcode.BarHeight = 20 'Hide the value to encode in the barcode image objBarcode.DisplayCode = False 'Generate the barcode image Return objBarcode.GetBarcodeImage() End Function
Click OK to close the dialog box.
- Now we're going to design the Product List report layout. In the Layout tab of the report drag & drop the following controls and fields as is shown in the following figure:
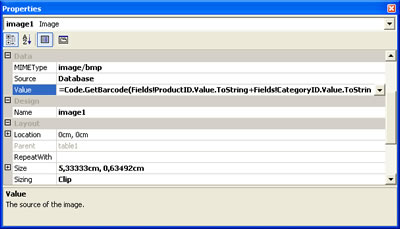
The image control that will hold the barcode image has to have its Source property set to Database, the Sizing property to Clip, and the Value property to this: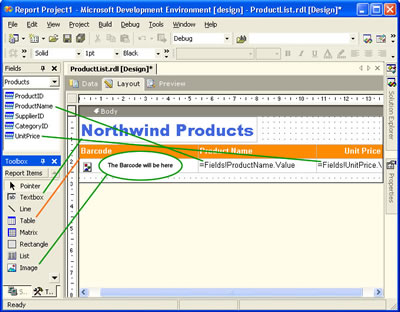
=Code.GetBarcode(Fields!ProductID.Value.ToString+Fields!CategoryID.Value.ToString+Fields!SupplierID.Value.ToString)
IMPORTANT:
If you left the property Sizing as AutoSize for the Image control that will hold the barcode image, the resultant barcode will be "deformed" and maybe it won't be readable. That's why we'll have to set that property to Clip and make the column and row for the barcode image large enough to accommodate the largest barcode image so that it don't be clipped.
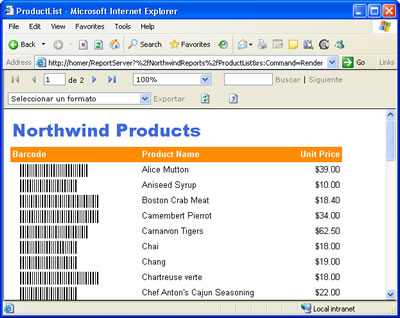
Note that in this case we've concatenated the ProductID, CategoryID, and SupplierID fields in order to get a significant barcode image. But it's only a sample and you could specify, for example, the ProductID field only. - That's all. Click on Preview tab and you'll get something like the following:
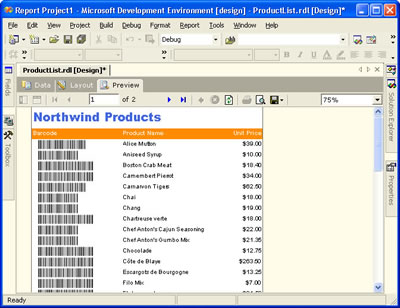
Note that the barcode images have different widths. See the IMPORTANT note in the previous step. - Deployment Information
To deploy a Reporting Services report that uses Barcode Professional read the Deployment topic in the Barcode Professional for Reporting Services documentation. - That's it. The Report Server is ready to deliver reports with barcode images into them.