
Microsoft Visual Studio Configuration
IMPORTANT NOTE - READ CAREFULLY
YOU WILL ABLE TO USE THE BARCODE CRI (Custom Report Item) WITH DESIGN-TIME FEATURES IF AND ONLY IF THE SQL SERVER THAT WILL BE RUNNING THE REPORT SERVER IS STANDARD, ENTERPRISE, BUSINESS OR DATACENTER EDITIONS ONLY! OTHER SQL SERVER EDITIONS SUCH AS EXPRESS, WORKGROUP OR WEB; LACK OF SUPPORT FOR THIRD PARTY CRIs. PLEASE REFER TO First Steps with Barcode Professional for SQL Server Reporting Services TOPIC FOR FURTHER DETAILS ON HOW TO USE BARCODE PROFESSIONAL IN DIFFERENT REPORTING SERVICES SCENARIOS.
YOU WILL ABLE TO USE THE BARCODE CRI (Custom Report Item) WITH DESIGN-TIME FEATURES IF AND ONLY IF THE SQL SERVER THAT WILL BE RUNNING THE REPORT SERVER IS STANDARD, ENTERPRISE, BUSINESS OR DATACENTER EDITIONS ONLY! OTHER SQL SERVER EDITIONS SUCH AS EXPRESS, WORKGROUP OR WEB; LACK OF SUPPORT FOR THIRD PARTY CRIs. PLEASE REFER TO First Steps with Barcode Professional for SQL Server Reporting Services TOPIC FOR FURTHER DETAILS ON HOW TO USE BARCODE PROFESSIONAL IN DIFFERENT REPORTING SERVICES SCENARIOS.
Before you follow the steps described below, please ensure that Neodynamic Barcode Professional is correctly configured to work with VS & Reporting Services. For more info about it please refer to Configuring Barcode Professional for Reporting Services topic.
- Launch Visual Studio or SQL Server Business Intelligence Development Studio or SQL Server Data Tools
- Create a new Report Server Project or open an existing one.
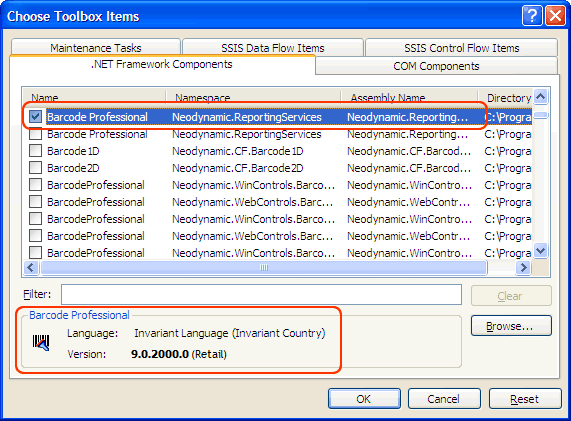
- Open the Toolbox, right-click on it, and select Choose Items
- Click on Browse button, and navigate to the folder you installed it to.
- Browse to the Bin\BarcodeCRI\ and open the folder that matches your Visual Studio version.
- Select Neodynamic.ReportingServices.Barcode.dll from that dialog, and click on Open.
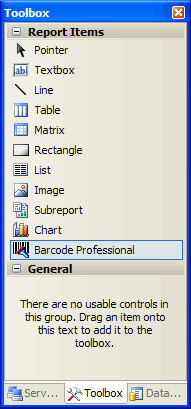
- Click on OK button.
 Visit Neodynamic's website.