License Registration
Overview
When you buy a commercial version of JSPrintManager for Blazor you are provided with license information to register the product in your website. The license information you've received includes two values, the License Owner and License Key
There are three ways to setup the license info. License registration requires coding a .NET Controller so refer to Option ❶ or Option ❷ below. In case you cannot use a Controller, then please refer to Option ❸.
❶ License Setting On Website
This license setting option is done on the same website that is using the JSPrintManager Razor Component (Neodynamic.Blazor.JSPrintManager.dll) file. To register JSPrintManager in your Blazor project, you must code a .NET Controller so the license information is returned by this URL: //ORIGIN/jspm where ORIGIN is the one displayed by localhost's origin entry for your website. Here's a sample from our online demo website:
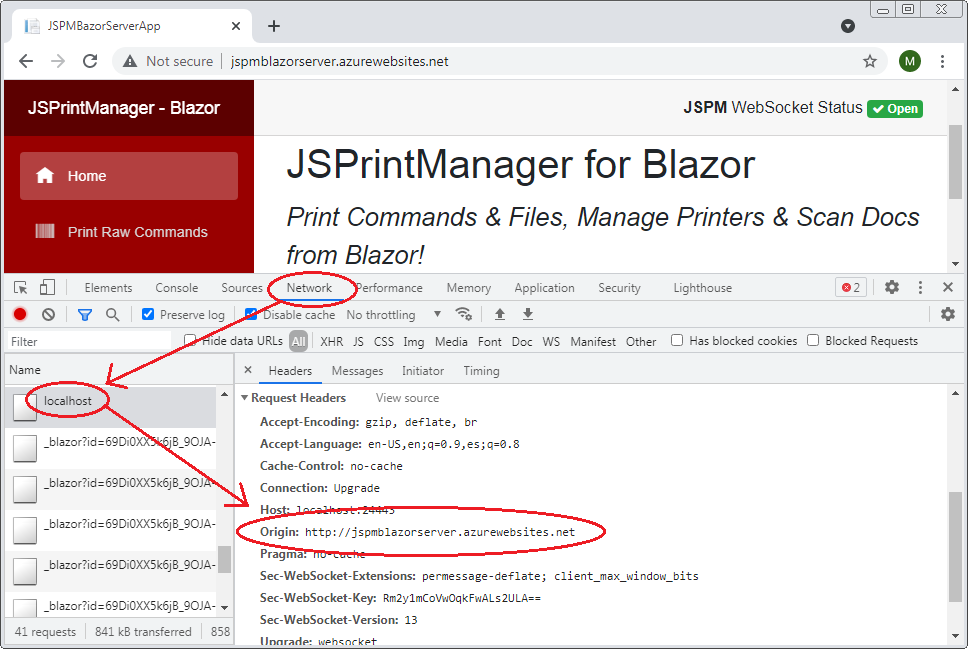
In this case, the license info must be configured under https://jspmblazorserver.azurewebsites.net/jspm
Note
Alternatively you could specify a different path to provide the license info but it must be located under the same ORIGIN. For example, based on the website sample, if we decided to return the license info from https://jspmblazorserver.azurewebsites.net/licenses/jsprintmanager, then we must specify it in the JSPrintManager Start method as follows
JSPrintManager.Start("https://jspmblazorserver.azurewebsites.net/licenses/jsprintmanager");
❷ License Setting On an external sever/URL
This license setting option is done outside the boundary of the Blazor app using the Neodynamic.Blazor.JSPrintManager.dll file. License registration requires coding a .NET Controller so if the website that is using the Neodynamic.Blazor.JSPrintManager.dll file does not allow you to write a Controller, then this option allows you to setup the license info on an external URL.
Important
This option requires a special License Owner format where the ORIGIN/DOMAIN (as described above and shown in the sample figure) of the printing website must be specified. You must request this type of license to our sales team after placing an order by specifying the ORIGIN value in your case. The URL from where the license info must be returned must be specified in the JSPrintManager Start method as shown in the following snipped code:
JSPrintManager.Start("https://external-server/whatever/get-jspm-license");
The specified licenseUrl must resolve to a .NET Controller.
❸ License Setting On Neodynamic server
If you cannot use a .NET Controller in your website and you cannot create another website to return the license info, then Neodynamic offers you to host your license info at https://neodynamic.com which runs on MS Azure data centers at no extra costs. If this is an option for you, then please contact our Support Team
Registering the License Info
Serving the license from your own Blazor project
Please do the following in the Blazor project where you'll be registering JSPrintManager:
Important
The following approach will work for Blazor Server and Blazor WebAssembly Hosted under ASP.NET Core projects. For Blazor WebAssembly Standalone apps, then refer to Option ❷ or Option ❸ described above.
- Edit the Startup.cs file and add the following line in the Configure method:
app.UseEndpoints(endpoints =>
{
    endpoints.MapDefaultControllerRoute(); // Needed for JSPrintManager licensing

    endpoints.MapBlazorHub();
    endpoints.MapFallbackToPage("/_Host");
});
- Create a new Controller and name it JSPMController; or edit the file that will be pointed by the
licenseUrl(read about this param above)
Important
The license controller can be protected from unauthorized requests through any HTTP Authorization Header protection options. The Authorization header content must be specified through the licenseAuthorizationHeader param of the JSPrintManager.Start() method. Be aware that if you do not provide any authorization method, then you must allow ANONYMOUS access on the license controller. For instance, you could use JSON Web Tokens (JWT) and set it as follows:
// Set the JSON Web Token (JWT) ... REPLACE <token> with the real value!!!
var licenseAuthorizationHeader = "Bearer <token>";

// Start WebSocket comm
JSPrintManager.Start("LIC_URL", 28443, "127.0.0.1", true, licenseAuthorizationHeader);

//... more code...
- Then copy/paste the following code and specify the License Owner and License Key values you have received:
public class JSPMController : Controller
{
    [AllowAnonymous]
    public IActionResult Index(string timestamp)
    {
        //SET THE LICENSE INFO
        return File(Neodynamic.Blazor.JSPrintManager.GenerateLicense("YOUR-LICENSE-OWNER-HERE", "YOUR-LICNESE-KEY-HERE", timestamp), "text/plain");
    }
}
- That's it! Try running your app, when trying to print, the eval dialog should not be displayed to the user.
Serving the license from an Azure Function (C#)
Important
This option requires a special License Owner format where the ORIGIN/DOMAIN (as described above and shown in the sample figure) of the printing website must be specified. You must request this type of license to our sales team after placing an order by specifying the ORIGIN value in your case.
Create a new Azure Function (Http Trigger) and name it JSPMLic
Then copy/paste the following code:
public class JSPMLic
{
    private readonly ILogger _logger;

    public JSPMLic(ILoggerFactory loggerFactory)
    {
      _logger = loggerFactory.CreateLogger<JSPMLic>();
    }

    [Function("JSPMLic")]
    public async Task<HttpResponseData> Run([HttpTrigger(AuthorizationLevel.Anonymous, "get", "post")] HttpRequestData req)
    {
        //SET THE LICENSE INFO
        string license_owner = "YOUR-LICENSE-OWNER-HERE";
        string license_key = "YOUR-LICNESE-KEY-HERE";

        //DO NOT MODIFY THE FOLLOWING CODE
        var queryCollection = HttpUtility.ParseQueryString(req.Url.Query);
        string timestamp = queryCollection["timestamp"];
        var licenseContent = Neodynamic.Blazor.JSPrintManager.GenerateLicense(license_owner, license_key, timestamp);
        string licenseText = System.Text.Encoding.UTF8.GetString(licenseContent);
        var response = req.CreateResponse(HttpStatusCode.OK);
        response.Headers.Add("Content-Type", "text/plain; charset=utf-8");
        response.WriteString(licenseText);
        return response;
    }
}
Then specify your Azure Function to the following call (change the URL based on your own value):
JSPrintManager.Start("https://azure-function-domain/api/JSPMLic");
- That's it! Try running your app, when trying to print, the eval dialog should not be displayed to the user.