Barcode CRI Sample
In this simple guide, you will learn how to use the Barcode CRI component in RDL reports.
System Requirements
Visual Studio (VS) 2005/2008/2010/2012/2013/2015/2017+ or Business Intelligent Development Studio (BIDS) 2005/2008 or SQL Server Data Tools
Reporting Services 2005/2008/2008-R2/2012/2014/2016/2017/2019 Standard OR Enterprise OR Business OR Datacenter Editions ONLY
Important
If you are using Express OR Workgroup OR Web Editions, then use the Barcode DLL component and NOT the Barcode CRI
In the following sample you'll create a Report Server Project which features barcode images by using Barcode CRI. This project will contain a simple RDL report displaying a List of products from Microsoft's AdventureWorks database sample http://msftdbprodsamples.codeplex.com/
Note
This guide uses Visual Studio 2008 for reference but you can use the same approach if using a different Visual Studio version
Please follow up these steps:
Please ensure you've correctly configured Barcode CRI component
Open Visual Studio (or BIDS or SSDT) and create a new Report Server Project
- If you still have not added Barcode Professional CRI into the VS toolbox, then do it now!
With the Report Server project opened, add a new Data Source pointing to the AventureWorks database sample
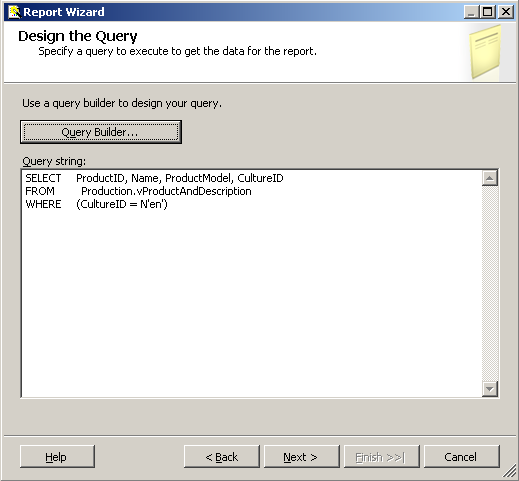
Add a new Report item, name it to ProductList.rdlc, and enter the following SQL Statement:
SELECT ProductID, Name, ProductModel, CultureID FROM Production.vProductAndDescription WHERE (CultureID = N'en')
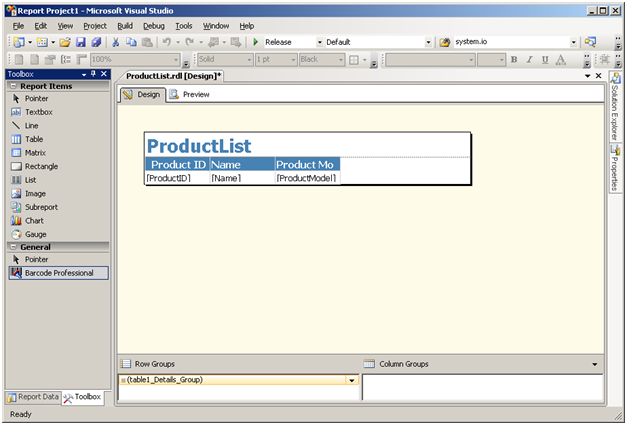
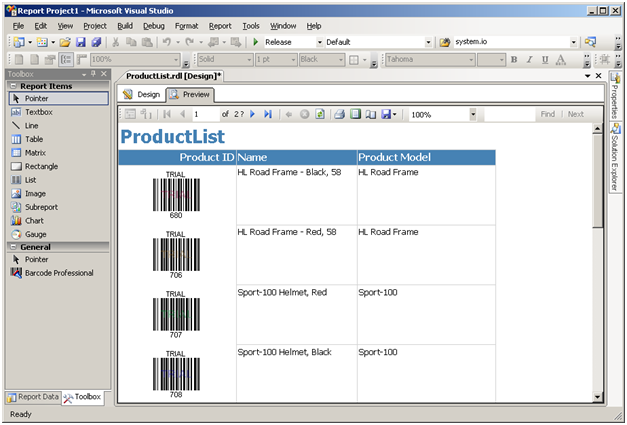
- Select a Tabular type report and add the ProductID, Name, and ProductModel fields into the Report's Detail section. The report should look like the following figure:
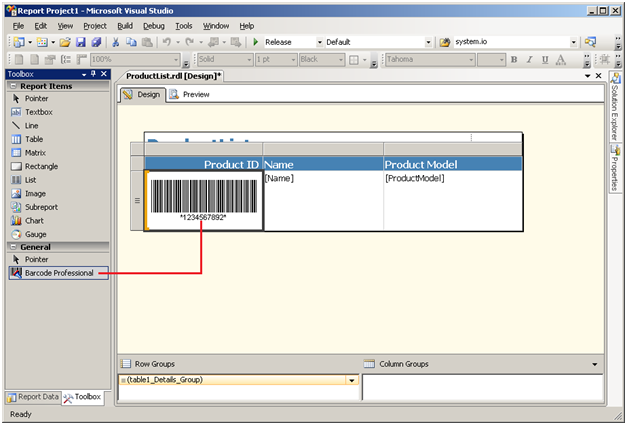
- Now, from the VS toolbox, drag & drop Barcode Professional CRI onto the first column of the table.
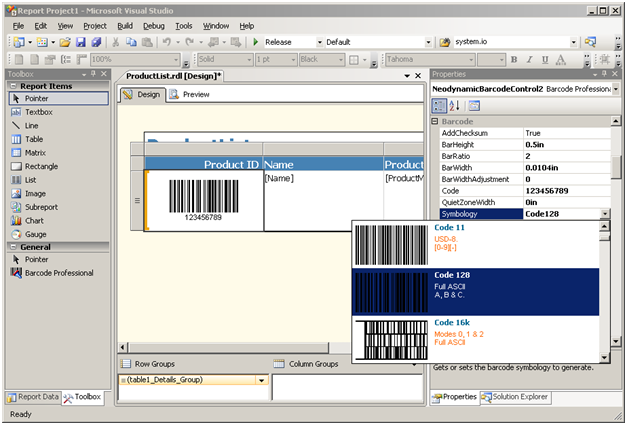
- Now it's time to set some properties of Barcode Professional. When generating barcodes, you should know about what Barcode Symbology you need to encode. Most common symbologies are Code 39, Code 128, GS1-128, GS1 DataBar, EAN-13, UPC-A, Data Matrix, QR Code, etc. The barcode symbology is set up by using Symbology property. In this sample, you will use Code 128 barcode, a common symbology which can be used for encoding full ASCII strings. So click on the barcode inside the table and hit F4 to display the VS Properties Window. Look for Symbology property and set it to Code128 as shown in the following figure:
- After you know which symbology you will encode, you should set up the VALUE (string) you want it becomes into the barcode. This is in general a field of the report's data source. In this sample, you will encode the ProductID field. So click on the barcode inside the table and hit F4 to display the VS Properties Window. Look for Code property and set it to the following expression: =Fields!ProductID.Value as shown in the following figure:
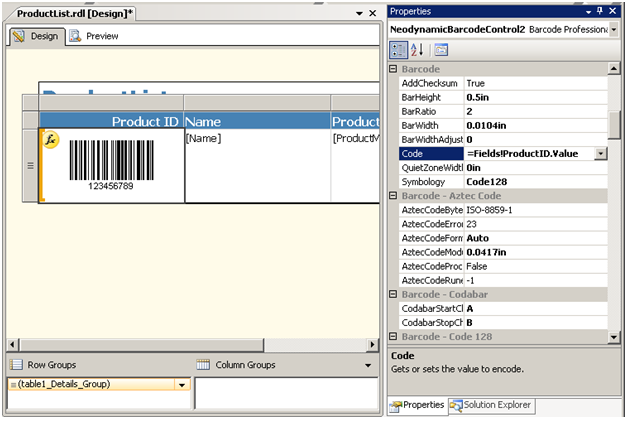
You'll notice that when you set up a Data Source's field to some property of Barcode Professional CRI, a yellow formula icon will appear on the barcode image, indicating that the barcode is data-bounded.
That's it! Click on the Preview tab to preview the report with barcodes
Deployment
When you are ready for production, you must ensure that Barcode Professional is correctly configured and deployed to your Report Server! All steps for correctly deploying Barcode Professional CRI are stated in the Barcode CRI Deployment topic.
Need Assistance?
- For tech assistance please contact our Tech Support