
Neodynamic Barcode Professional 3.0 (or greater) for Windows Forms (WinControl)
Microsoft .NET Framework 2.0 (or greater)
Microsoft Visual Studio 2005 or Visual Studio 2005 Express Editions (Visual Basic 2005 Express, Visual C# 2005 Express, etc). NOTE: For Express Editions, installing the free add-in for ReportViewer is mandatory.
Microsoft SQL Server 2005 (any version) with AdventureWorks Database sample installed
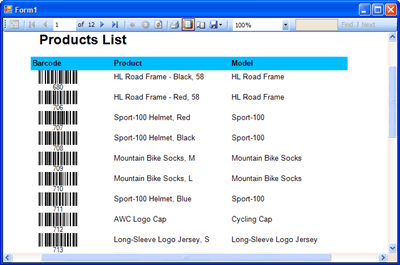
In the following Step-By-Step Guide we're going to create a local report (RDLC file) which features barcoding capabilities by using Barcode Professional for .NET Windows Forms.
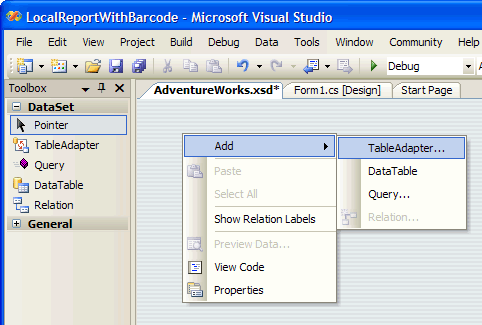
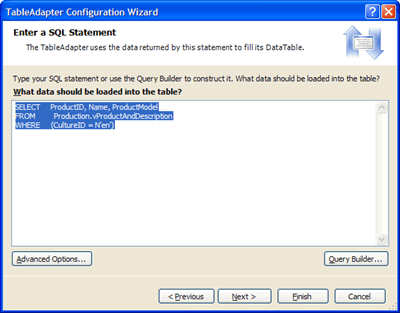
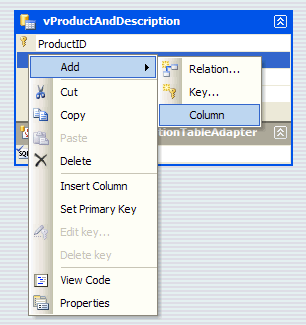
Follow these steps:
Follow these steps:

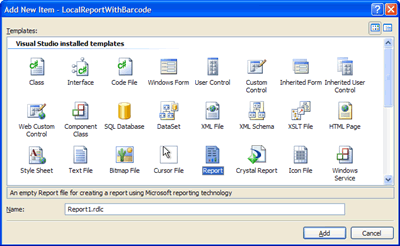
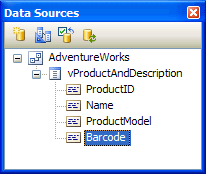
![Setting up the Barcode Column to System.Byte[] data type](https://www.neodynamic.com/Support/FAQs/65/figure05Small.png)
Private Sub Form1_Load(ByVal sender As Object, ByVal e As System.EventArgs) Handles Me.Load

    'Fill the datasource from DB
    Me.vProductAndDescriptionTableAdapter.Fill(Me.AdventureWorks.vProductAndDescription)

    'Create an instance of Barcode Professional
    Dim bcp As New Neodynamic.WinControls.BarcodeProfessional.BarcodeProfessional()
    'Barcode settings
    bcp.Symbology = Neodynamic.WinControls.BarcodeProfessional.Symbology.Code128
    bcp.BarHeight = 0.25F

    'Update DataTable with barcode image
    Dim row As AdventureWorks.vProductAndDescriptionRow

    For Each row In Me.AdventureWorks.vProductAndDescription.Rows
        'Set the value to encode
        bcp.Code = row.ProductID.ToString()
        'Generate the barcode image and store it into the Barcode Column
        row.Barcode = bcp.GetBarcodeImage(System.Drawing.Imaging.ImageFormat.Png)
    Next

    Me.reportViewer1.RefreshReport()
End Sub
private void Form1_Load(object sender, EventArgs e)
{
    //Fill the datasource from DB
    this.vProductAndDescriptionTableAdapter.Fill(this.AdventureWorks.vProductAndDescription);

    //Create an instance of Barcode Professional
    Neodynamic.WinControls.BarcodeProfessional.BarcodeProfessional bcp = new Neodynamic.WinControls.BarcodeProfessional.BarcodeProfessional();
    //Barcode settings
    bcp.Symbology = Neodynamic.WinControls.BarcodeProfessional.Symbology.Code128;
    bcp.BarHeight = 0.25f;

    //Update DataTable with barcode image
    foreach(AdventureWorks.vProductAndDescriptionRow row in this.AdventureWorks.vProductAndDescription.Rows)
    {
        //Set the value to encode
        bcp.Code = row.ProductID.ToString();
        //Generate the barcode image and store it into the Barcode Column
        row.Barcode = bcp.GetBarcodeImage(System.Drawing.Imaging.ImageFormat.Png);
    }

    this.reportViewer1.RefreshReport();
} 
Private Sub Button1_Click(ByVal sender As Object, ByVal e As System.EventArgs) Handles Me.Button1.Click

    'Create an instance of ReportViewer
    Dim viewer As New Microsoft.Reporting.WinForms.ReportViewer()

    'Set local report
    'NOTE: LocalReportWithBarcode refers to the namespace for the app.
    viewer.LocalReport.ReportEmbeddedResource = "LocalReportWithBarcode.Report1.rdlc"

    'Generate Data Source...
    'Fill the datasource from DB
    Dim ta As New AdventureWorksTableAdapters.vProductAndDescriptionTableAdapter()
    Dim dt As New AdventureWorks.vProductAndDescriptionDataTable()
    ta.Fill(dt)

    'Create an instance of Barcode Professional
    Dim bcp As New Neodynamic.WinControls.BarcodeProfessional.BarcodeProfessional()
    'Barcode settings
    bcp.Symbology = Neodynamic.WinControls.BarcodeProfessional.Symbology.Code128
    bcp.BarHeight = 0.25F

    'Update DataTable with barcode image
    Dim row As AdventureWorks.vProductAndDescriptionRow

    For Each row In dt.Rows
        'Set the value to encode
        bcp.Code = row.ProductID.ToString()
        'Generate the barcode image and store it into the Barcode Column
        row.Barcode = bcp.GetBarcodeImage(System.Drawing.Imaging.ImageFormat.Png)
    Next

    'Create Report Data Source
    Dim rptDataSource As New Microsoft.Reporting.WinForms.ReportDataSource("AdventureWorks_vProductAndDescription", dt)
    viewer.LocalReport.DataSources.Add(rptDataSource)

    'Export to PDF. Get binary content.
    Dim pdfContent As Byte() = viewer.LocalReport.Render("PDF", Nothing, Nothing, Nothing, Nothing, Nothing, Nothing)

    'Creatr PDF file on disk
    Dim pdfPath As String = "C:\temp\reportBarcode.pdf"
    Dim pdfFile As New System.IO.FileStream(pdfPath, System.IO.FileMode.Create)
    pdfFile.Write(pdfContent, 0, pdfContent.Length)
    pdfFile.Close()

    'Open PDF file
    System.Diagnostics.Process.Start(pdfPath)

End Sub
private void button1_Click(object sender, EventArgs e)
{
    //Create an instance of ReportViewer
    Microsoft.Reporting.WinForms.ReportViewer viewer = new Microsoft.Reporting.WinForms.ReportViewer();

    //Set local report
    //NOTE: LocalReportWithBarcode refers to the namespace for the app.
    viewer.LocalReport.ReportEmbeddedResource = "LocalReportWithBarcode.Report1.rdlc";

    //Generate Data Source...
    //Fill the datasource from DB
    AdventureWorksTableAdapters.vProductAndDescriptionTableAdapter ta = new AdventureWorksTableAdapters.vProductAndDescriptionTableAdapter();
    AdventureWorks.vProductAndDescriptionDataTable dt = new AdventureWorks.vProductAndDescriptionDataTable();
    ta.Fill(dt);

    //Create an instance of Barcode Professional
    Neodynamic.WinControls.BarcodeProfessional.BarcodeProfessional bcp = new Neodynamic.WinControls.BarcodeProfessional.BarcodeProfessional();
    //Barcode settings
    bcp.Symbology = Neodynamic.WinControls.BarcodeProfessional.Symbology.Code128;
    bcp.BarHeight = 0.25f;

    //Update DataTable with barcode image
    foreach(AdventureWorks.vProductAndDescriptionRow row in dt.Rows)
    {
        //Set the value to encode
        bcp.Code = row.ProductID.ToString();
        //Generate the barcode image and store it into the Barcode Column
        row.Barcode = bcp.GetBarcodeImage(System.Drawing.Imaging.ImageFormat.Png);
    }

    //Create Report Data Source
    Microsoft.Reporting.WinForms.ReportDataSource rptDataSource = new Microsoft.Reporting.WinForms.ReportDataSource("AdventureWorks_vProductAndDescription", dt);
    viewer.LocalReport.DataSources.Add(rptDataSource);

    //Export to PDF. Get binary content.
    string mimeType;
    string encoding;
    string fileNameExtension;
    string[] streams;
    Microsoft.Reporting.WinForms.Warning[] warnings;

    byte[] pdfContent = viewer.LocalReport.Render("PDF", null, out mimeType, out encoding, out fileNameExtension, out streams, out warnings);

    //Creatr PDF file on disk
    string pdfPath = @"C:\temp\reportBarcode.pdf";
    System.IO.FileStream pdfFile = new System.IO.FileStream(pdfPath, System.IO.FileMode.Create);
    pdfFile.Write(pdfContent, 0, pdfContent.Length);
    pdfFile.Close();

    //Open PDF file
    System.Diagnostics.Process.Start(pdfPath);

} 
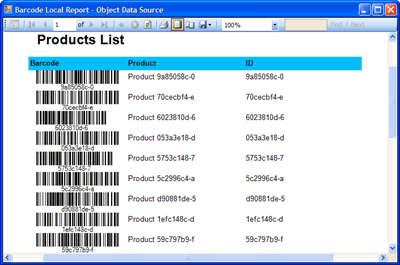
You can design local reports (RDLC) based on business objects defined in your application. In this scenario, an object data source is simply a collection of arbitrary objects. In this guide, we'll define a custom object with barcoding support that will be used as data source for our report.
Follow these steps:
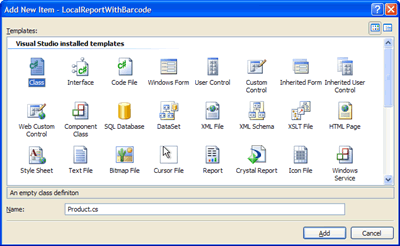
Public Class Product

    Dim m_id As String
    Dim m_name As String
    Dim m_barcode As Byte()

    Public Sub New(ByVal id As String, ByVal name As String, ByVal barcode As Byte())
        m_id = id
        m_name = name
        m_barcode = barcode
    End Sub

    Public Property Id() As String
        Get
            Return m_id
        End Get
        Set(ByVal value As String)
            m_id = value
        End Set
    End Property

    Public Property Name() As String
        Get
            Return m_name
        End Get
        Set(ByVal value As String)
            m_name = value
        End Set
    End Property

    Public Property Barcode() As Byte()
        Get
            Return m_barcode
        End Get
        Set(ByVal value As Byte())
            m_barcode = value
        End Set
    End Property

End Class
public class Product
{
    string m_id;
    string m_name;
    byte[] m_barcode;

    public Product(string id, string name, byte[] barcode)
    {
        m_id = id;
        m_name = name;
        m_barcode = barcode;
    }

    public string Id
    {
        get
        {
            return m_id;
        }
        set
        {
            m_id = value;
        }
    }

    public string Name
    {
        get
        {
            return m_name;
        }
        set
        {
            m_name = value;
        }
    }

    public byte[] Barcode
    {
        get
        {
            return m_barcode;
        }
        set
        {
            m_barcode = value;
        }
    }
} 


Private Sub Form1_Load(ByVal sender As Object, ByVal e As System.EventArgs) Handles Me.Load

    'Create an instance of Barcode Professional
    Dim bcp = new Neodynamic.WinControls.BarcodeProfessional.BarcodeProfessional()
    'Barcode settings
    bcp.Symbology = Neodynamic.WinControls.BarcodeProfessional.Symbology.Code128
    bcp.BarHeight = 0.25F

    'Fill the object datasource.
    'NOTE: You may connect to a SQL Server Database and create Product objects based on data returned from such source.
    Dim data As New List(Of Product)

    'Create random product info
    Dim prodId As String
    Dim prodName As String
    Dim prodBarcode As Byte()

    Dim i As Integer = 0

    For i = 1 To 10
        'Random product info
        prodId = Guid.NewGuid().ToString().Substring(0, 10)
        prodName = "Product " + prodId
        'Set the value to encode
        bcp.Code = prodId
        'Generate the barcode image and store it into the Barcode Column
        prodBarcode = bcp.GetBarcodeImage(System.Drawing.Imaging.ImageFormat.Png)

        'Add new product
        data.Add(New Product(prodId, prodName, prodBarcode))
    Next

    'Set object data source
    Me.ProductBindingSource.DataSource = data

    Me.ReportViewer1.RefreshReport()
End Sub
private void Form1_Load(object sender, EventArgs e)
{
    //Create an instance of Barcode Professional
    Neodynamic.WinControls.BarcodeProfessional.BarcodeProfessional bcp = new Neodynamic.WinControls.BarcodeProfessional.BarcodeProfessional();
    //Barcode settings
    bcp.Symbology = Neodynamic.WinControls.BarcodeProfessional.Symbology.Code128;
    bcp.BarHeight = 0.25f;

    //Fill the object datasource.
    //NOTE: You may connect to a SQL Server Database and create Product objects based on data returned from such source.
    List data = new List();

    //Create random product info
    string prodId;
    string prodName;
    byte[] prodBarcode;

    for (int i = 0; i < 10; i++)
    {
        //Random product info
        prodId = Guid.NewGuid().ToString().Substring(0, 10);
        prodName = "Product " + prodId;
        //Set the value to encode
        bcp.Code = prodId;
        //Generate the barcode image and store it into the Barcode Column
        prodBarcode = bcp.GetBarcodeImage(System.Drawing.Imaging.ImageFormat.Png);

        //Add new product
        data.Add(new Product(prodId, prodName, prodBarcode));
    }

    //Set object data source
    this.ProductBindingSource.DataSource = data;

    this.reportViewer1.RefreshReport();
} 
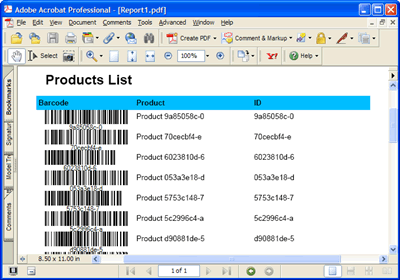
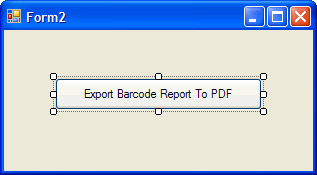
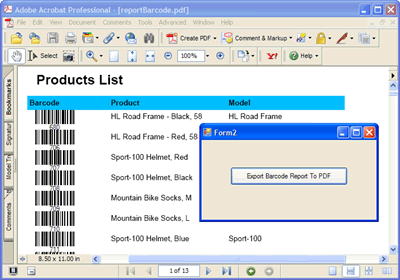
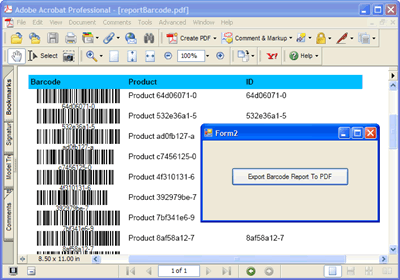
The following walkthrough shows how to programmatically export a local report to PDF without viewing it.
Private Sub Button1_Click(ByVal sender As Object, ByVal e As System.EventArgs) Handles Me.Button1.Click

    'Create an instance of ReportViewer
    Dim viewer As New Microsoft.Reporting.WinForms.ReportViewer()

    'Set local report
    'NOTE: LocalReportWithBarcode refers to the namespace for the app.
    viewer.LocalReport.ReportEmbeddedResource = "LocalReportWithBarcode.Report1.rdlc"

    'Create an instance of Barcode Professional
    Dim bcp As New Neodynamic.WinControls.BarcodeProfessional.BarcodeProfessional()
    'Barcode settings
    bcp.Symbology = Neodynamic.WinControls.BarcodeProfessional.Symbology.Code128
    bcp.BarHeight = 0.25F

    'Generate Data Source...
    'NOTE: You may connect to a SQL Server Database and create Product objects based on data returned from such source.
    Dim data As New List(Of Product)

    'Create random product info
    Dim prodId As String
    Dim prodName As String
    Dim prodBarcode As Byte()

    Dim i As Integer = 0

    For i = 1 To 10
        'Random product info
        prodId = Guid.NewGuid().ToString().Substring(0, 10)
        prodName = "Product " + prodId
        'Set the value to encode
        bcp.Code = prodId
        'Generate the barcode image and store it into the Barcode Column
        prodBarcode = bcp.GetBarcodeImage(System.Drawing.Imaging.ImageFormat.Png)

        'Add new product
        data.Add(New Product(prodId, prodName, prodBarcode))
    Next


    'Create Report Data Source
    Dim rptDataSource As New Microsoft.Reporting.WinForms.ReportDataSource("LocalReportWithBarcode_Product", data)
    viewer.LocalReport.DataSources.Add(rptDataSource)

    'Export to PDF. Get binary content.
    Dim pdfContent As Byte() = viewer.LocalReport.Render("PDF", Nothing, Nothing, Nothing, Nothing, Nothing, Nothing)

    'Creatr PDF file on disk
    Dim pdfPath As String = "C:\temp\reportBarcode.pdf"
    Dim pdfFile As New System.IO.FileStream(pdfPath, System.IO.FileMode.Create)
    pdfFile.Write(pdfContent, 0, pdfContent.Length)
    pdfFile.Close()

    'Open PDF file
    System.Diagnostics.Process.Start(pdfPath)

End Sub
private void button1_Click(object sender, EventArgs e)
{
    //Create an instance of ReportViewer
    Microsoft.Reporting.WinForms.ReportViewer viewer = new Microsoft.Reporting.WinForms.ReportViewer();

    //Set local report
    //NOTE: LocalReportWithBarcode refers to the namespace for the app.
    viewer.LocalReport.ReportEmbeddedResource = "LocalReportWithBarcode.Report1.rdlc";

    //Create an instance of Barcode Professional
    Neodynamic.WinControls.BarcodeProfessional.BarcodeProfessional bcp = new Neodynamic.WinControls.BarcodeProfessional.BarcodeProfessional();
    //Barcode settings
    bcp.Symbology = Neodynamic.WinControls.BarcodeProfessional.Symbology.Code128;
    bcp.BarHeight = 0.25f;

    //Generate Data Source...
    //NOTE: You may connect to a SQL Server Database and create Product objects based on data returned from such source.
    List data = new List();

    //Create random product info
    string prodId;
    string prodName;
    byte[] prodBarcode;

    for (int i = 0; i < 10; i++)
    {
        //Random product info
        prodId = Guid.NewGuid().ToString().Substring(0, 10);
        prodName = "Product " + prodId;
        //Set the value to encode
        bcp.Code = prodId;
        //Generate the barcode image and store it into the Barcode Column
        prodBarcode = bcp.GetBarcodeImage(System.Drawing.Imaging.ImageFormat.Png);

        //Add new product
        data.Add(new Product(prodId, prodName, prodBarcode));
    }

    //Create Report Data Source
    Microsoft.Reporting.WinForms.ReportDataSource rptDataSource = new Microsoft.Reporting.WinForms.ReportDataSource("LocalReportWithBarcode_Product", data);
    viewer.LocalReport.DataSources.Add(rptDataSource);

    //Export to PDF. Get binary content.
    string mimeType;
    string encoding;
    string fileNameExtension;
    string[] streams;
    Microsoft.Reporting.WinForms.Warning[] warnings;

    byte[] pdfContent = viewer.LocalReport.Render("PDF", null, out mimeType, out encoding, out fileNameExtension, out streams, out warnings);

    //Creatr PDF file on disk
    string pdfPath = @"C:\temp\reportBarcode.pdf";
    System.IO.FileStream pdfFile = new System.IO.FileStream(pdfPath, System.IO.FileMode.Create);
    pdfFile.Write(pdfContent, 0, pdfContent.Length);
    pdfFile.Close();

    //Open PDF file
    System.Diagnostics.Process.Start(pdfPath);
} 
We provide best-in-class customer service and support directly from members of our dev team! If we are available when you contact us, you will get a response in few minutes; otherwise the maximum turnaround is 24hs in most cases.