Barcode data binding in .NET Compact Framework and SQL Server Compact Edition
Product Barcode Professional for .NET Compact Framework
Published 04/30/2007
Updated 04/30/2007
Overview
This walkthrough illustrates how to easily create data binding scenarios in Smart Device projects such as Pocket PC, Smartphone, Windows CE and Windows Mobile featuring barcode capabilities leveraging .NET Compact Framework and Microsoft SQL Server 2005 Compact Edition technologies.
Requirements
Neodynamic Barcode Professional for .NET Compact Framework
Microsoft .NET Compact Framework 2.0 (or greater)
Microsoft Visual Studio 2005 SP1 (or greater)
Microsoft SQL Server 2005 Compact Edition Tools for Visual Studio 2005 Service Pack 1
(Optional) Windows Mobile 5.0 SDKs for Pocket PC
During the course of this walkthrough, you will develop a simple Pocket PC project that will access data from Northwind's Customers database sample delivered with SQL Server Compact Edition.
Please follow these steps:
- Ensure to install Barcode Professional for .NET Compact Framework and configure it in Visual Studio 2005 as is described in the "Getting Started > Visual Studio Configuration" topic in the product help.
- Open Visual Studio 2005 and create a new Smart Device project. In this walkthrough will be developing a Windows Mobile 5.0 Pocket PC application that is available after installing Windows Mobile 5.0 SDKs for Pocket PC. If you do not have it installed, then please select Pocket PC 2003 template.
- Adding a New Data Source
- We will add an existing SQL Compact Edition database called Northwind as a new data source. In Visual Studio, click Data, and then click Add New Data Source.
- The Data Source Configuration Wizard starts. In the Data Source Configuration Wizard, select Database, and then click Next.
- On the next screen, click New Connection. On the Choose Data Source dialog box, select Microsoft SQL Server 2005 Compact Edition, and then click OK, as shown in the following figure.
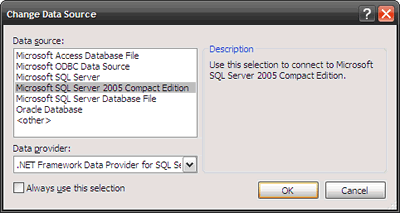 Choosing the data source
- On the Add Connection dialog box, verify that My Computer is selected as the Data Source. In Connection Properties, in Database, click Browse, browse to C:\Program Files\Microsoft Visual Studio 8\SmartDevices\SDK\SQL Server\Mobile\v3.0\Northwind.sdf, as shown in the following figure, and then click OK.
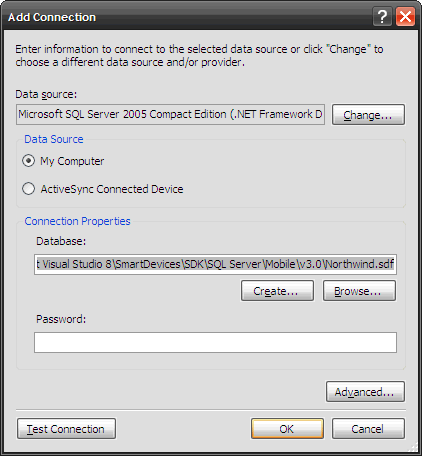 Establishing connection to Northwind database
- On the Choose your data connection screen, click Next, as shown in the following figure.
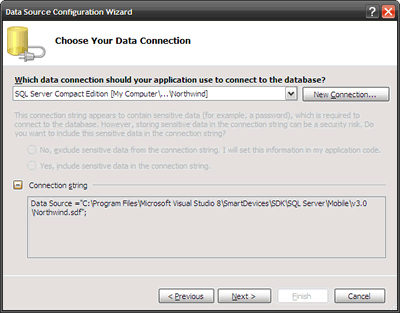 Choose the data connection
- In the Local database file dialog box, click Yes. Clicking Yes makes the database part of the Visual Studio project. The database will now be automatically copied to the device when the project is deployed. The Choose your database objects screen appears.
- In the Data Source Configuration Wizard dialog box, expand the Tables node, expand the Customers node and then select the following fields: Customer ID, Company Name, Contact Name, and Phone; as shown in the following figure.
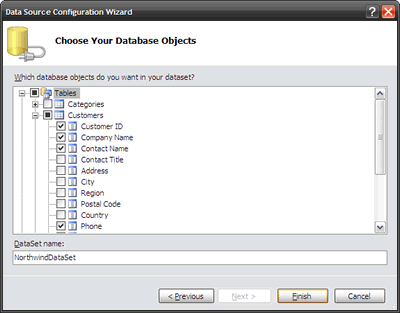 Choosing the Customers' fields
Click Finish.
- Creating the data binding form
- We will design a form to allow the user to scroll through the list of customers, one by one. We will place controls on the form to display Customers table fields. The Customer ID field will be displayed as a barcode image instead of plain text by using Barcode Professional UI Controls.
- In Visual Studio, open de default windows form or create a new one. Open it at design view.
- Click Data menu, and then click Show Data Sources. The Data Sources pane appears. In the Data Sources pane, expand the NorthwindDataSet node, and then expand the Customers node. On the drop-down list for Customers node, click Details. Customers node should looks like in the following figure.
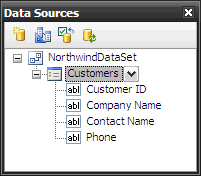 Customers details
- Drag the Customers node from the Data Sources pane, and drop it on the windows form. This creates Label and Textbox controls for the four table fields: Customer ID, Company Name, Contact Name, and Phone.
Notice the Component Tray at the bottom of the Designer window. Three components have been added: northwindDataSet, customersBindingSource, and customersTableAdapter, as shown in the following figure.
 The Component Tray
- Redesigning the form
- Delete the TextBox control for Customer ID because we will display a barcode image instead by using Barcode Professional UI Controls.
- In this sample we will use a Linear (1D) barcode Symbology called Code 39 but you could use 2D symbologies if that is your requirement (Note: in that case then please use Barcode2D control instead of Barcode1D).
Drag & drop a Barcode1D control from Visual Studio Toolbox on the windows form. Select the Barcode1D control and set the following properties:
- Symbology = Code39
- BarHeight = 0.3
- AddChecksum = False
- DisplayStartStopChar = False
- Text = empty string
- (Name) = customerBarcode
- Add two Button controls and set the Text property to << Previous and Next >> respectively.
- Finally, change the form layout so it looks like the following figure.
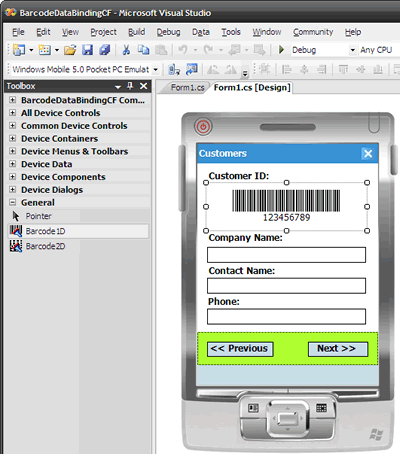 Data Binding form layout
- Coding the form
- Add the following private method that will enable or disable the navigation buttons depending on the current position of the data source.
VB
Private Sub UpdateButtonState()
    Me.button1.Enabled = (Me.customersBindingSource.Position > 0)
    Me.button2.Enabled = (Me.customersBindingSource.Position < Me.customersBindingSource.Count - 1)
End Sub
C#
private void UpdateButtonState()
{
    this.button1.Enabled = (this.customersBindingSource.Position > 0);
    this.button2.Enabled = (this.customersBindingSource.Position < this.customersBindingSource.Count - 1);
}
- Double click on "Previous" button and add the following code to the Click event handler.
VB
Me.customersBindingSource.Position = Me.customersBindingSource.Position - 1
Me.UpdateButtonState()
C#
this.customersBindingSource.Position -= 1;
this.UpdateButtonState();
- Double click on "Next" button and add the following code to the Click event handler.
VB
Me.customersBindingSource.Position = Me.customersBindingSource.Position + 1
Me.UpdateButtonState()
C#
this.customersBindingSource.Position += 1;
this.UpdateButtonState();
- Locate the customersBindingSource in the Component Tray and double click on it.
Then add the following code to the CurrentChanged event handler.
VB
'Get current row
Dim rowView As DataRowView = CType(Me.customersBindingSource.Current, DataRowView)
Dim row As NorthwindDataSet.CustomersRow = CType(rowView.Row, NorthwindDataSet.CustomersRow)
'Update barcode for customer's id
Me.customerBarcode.Code = row.Customer_ID
C#
//Get current row
DataRowView rowView = (DataRowView)this.customersBindingSource.Current;
NorthwindDataSet.CustomersRow row = (NorthwindDataSet.CustomersRow)rowView.Row;
//Update barcode for customer's id
this.customerBarcode.Code = row.Customer_ID;
- Testing the application
- Just build and test the application from Visual Studio. If you test it by using a Pocket PC Emulator you should get something like the following.
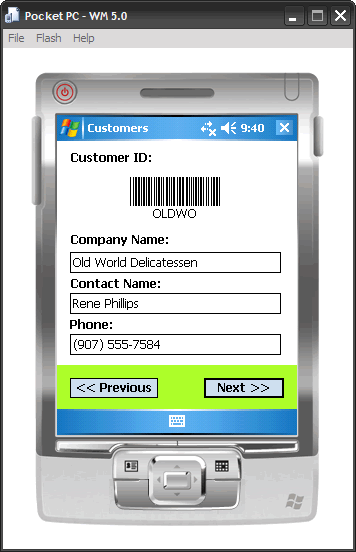 The Data Binding form featuring barcode images
