
Neodynamic Barcode Professional 7.0 for .NET Windows Forms (or greater)
Microsoft .NET Framework 3.5 (or greater)
Microsoft Visual Studio 2010 or Visual Basic 2010 Express or Visual C# 2010 Express
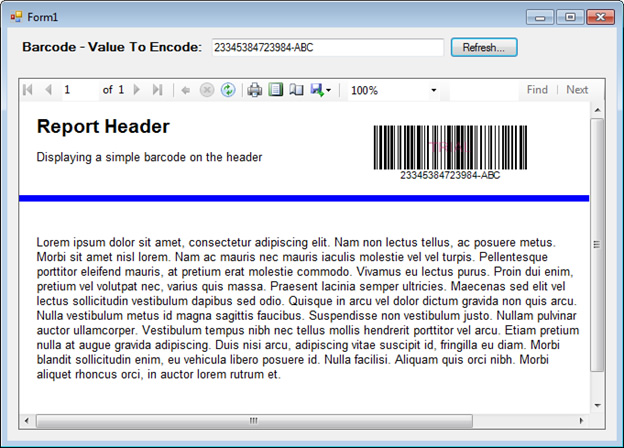
In this simple guide you will learn how to insert a barcode image to the Header or Footer sections of a RDLC report in a Windows Forms application project using C# or VB.NET and Neodynamic Barcode Professional for Windows Forms.
RDLC reports are included since Visual Studio 2005 and allow you to design reports in Visual Studio which are displayed on a form by using ReportViewer controls.
Please follow up these steps:
Public Function GetBarcodeImageHeader(ByVal barcodebase64 As String) As Byte()
	Return Convert.FromBase64String(barcodebase64)
End Function 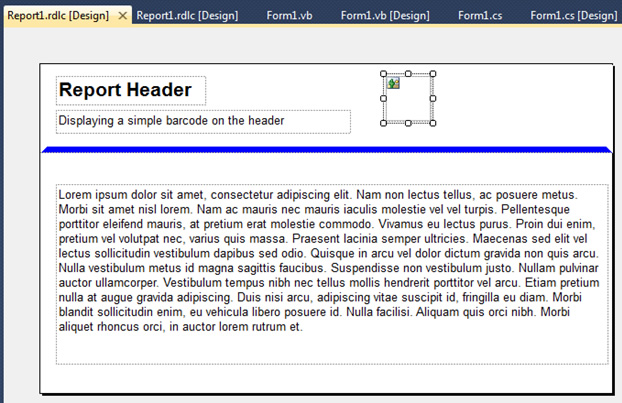
Private Sub UpdateBarcodeOnHeader()

    If (Me.textBox1.Text.Trim = "") Then
        MessageBox.Show("Please enter a value to encode, thanks!")
        Return
    End If

    Dim barcodeBase64 As String = ""

    'Create an instance of Barcode Professional
    Using bcp As New Neodynamic.WinControls.BarcodeProfessional.BarcodeProfessional()
        'Barcode settings
        bcp.Symbology = Neodynamic.WinControls.BarcodeProfessional.Symbology.Code128
        bcp.BarcodeUnit = Neodynamic.WinControls.BarcodeProfessional.BarcodeUnit.Inch
        bcp.BarWidth = 1.0F / 96.0F
        bcp.BarHeight = 0.5F

        'Set the value to encode
        bcp.Code = Me.textBox1.Text
        'Generate the barcode image and convert to base64 string
        barcodeBase64 = Convert.ToBase64String(bcp.GetBarcodeImage(System.Drawing.Imaging.ImageFormat.Png))
    End Using

    'Set report parameter
    Dim param As New Microsoft.Reporting.WinForms.ReportParameter("BarcodeBinaryContent", barcodeBase64, False)
    Me.ReportViewer1.LocalReport.SetParameters(New Microsoft.Reporting.WinForms.ReportParameter() {param})
    Me.ReportViewer1.RefreshReport()

End Sub
private void UpdateBarcodeOnHeader()
{

    if (this.textBox1.Text.Trim() == "")
    {
        MessageBox.Show("Please enter a value to encode, thanks!");
        return;
    }

    string barcodeBase64 = "";

    //Create an instance of Barcode Professional
    using (Neodynamic.WinControls.BarcodeProfessional.BarcodeProfessional bcp = new Neodynamic.WinControls.BarcodeProfessional.BarcodeProfessional())
    {
        //Barcode settings
        bcp.Symbology = Neodynamic.WinControls.BarcodeProfessional.Symbology.Code128;
        bcp.BarcodeUnit = Neodynamic.WinControls.BarcodeProfessional.BarcodeUnit.Inch;
        bcp.BarWidth = 1f / 96f;
        bcp.BarHeight = 0.5f;

        //Set the value to encode
        bcp.Code = this.textBox1.Text;
        //Generate the barcode image and convert to base64 string
        barcodeBase64 = Convert.ToBase64String(bcp.GetBarcodeImage(System.Drawing.Imaging.ImageFormat.Png));
    }

    //Set report parameter
    Microsoft.Reporting.WinForms.ReportParameter param = new Microsoft.Reporting.WinForms.ReportParameter("BarcodeBinaryContent", barcodeBase64, false);
    this.reportViewer1.LocalReport.SetParameters(new Microsoft.Reporting.WinForms.ReportParameter[] { param });

    this.reportViewer1.RefreshReport();
}
Me.textBox1.Text = "000111222333"

UpdateBarcodeOnHeader()
this.textBox1.Text = "000111222333";

UpdateBarcodeOnHeader();
UpdateBarcodeOnHeader()
UpdateBarcodeOnHeader();
Sample Files Download
Here are the VB.NET and C# versions of this sample. Please download the zip file and extract it.
Remember to download and install Barcode Professional for Windows Forms .NET in order to reproduce this sample demo.
We provide best-in-class customer service and support directly from members of our dev team! If we are available when you contact us, you will get a response in few minutes; otherwise the maximum turnaround is 24hs in most cases.