How to print raw Datamax DPL commands from Blazor
Product JSPrintManager for Blazor Published 07/07/2021 Updated 11/28/2024 Author Neodynamic
Overview
DPL (Datamax Programming Language) is one of the main printer languages from Datamax (now part of Honeywell International Inc.) that is supported by their printers which are widely used in POS (Point Of Sales or Point of Services) scenarios like retail, banking, hospitality, manufacturing, healthcare and more!
Datamax DPL commands are very simple and text plain! The main advantage of using raw Datamax DPL commands for printing instead of using the built-in browser javascript printing (window.print();) is that the printing performance will be way faster; a factor that is key in the aforementioned scenarios. You'll be able to use raw printing feature with the help of our JSPrintManager for Blazor solution that was specially designed for this kind of printing needs.
In this walkthrough, you'll learn how to print raw DPL commands from Blazor directly to the client printer without displaying a print dialog at all. You'll be able to print Datamax DPL commands to the Default client printer as well as to any other installed printer at the client machine. This solution works with any popular browser like Chrome, Firefox, IE/Edge & Safari on Windows, Linux, Raspberry Pi and Mac systems!
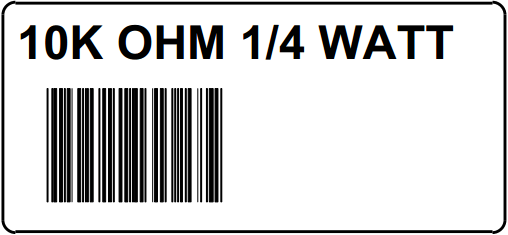
The Datamax DPL commands that we'll use in this article will print out a simple shipping label that will look like this:

A Sample Barcode Label printed from Blazor and created by using Datamax DPL commands
Follow up these steps
- Be sure you install in your dev machine JSPrintManager (JSPM) (Available for Windows, Linux, Raspberry Pi & Mac)
This small app must be installed on each client that will print from your website! - In your Blazor project...
- Add a NuGet reference to the JSPrintManager Razor Component
- Add the JSPrintManager service...
- Add the following statement at the top of your
Startupfile
using Neodynamic.Blazor;- For Blazor Server
Add the following line in theStartup's ConfigureServicesmethod
services.AddJSPrintManager();For .NET 8+ you must use Interactive Server components and render mode, so add these settings:
    builder.Services.AddRazorComponents()
    .AddInteractiveServerComponents();
app.MapRazorComponents<App>() .AddInteractiveServerRenderMode() - For Blazor WebAssembly
Add the following line in theProgram's Mainmethod
builder.Services.AddJSPrintManager();
- For Blazor Server
- Add the following statement at the top of your
- Add the following statement in the
_Imports.razorfile
@using Neodynamic.Blazor - Add a new Razor Page and copy/paste the following code. Please read the source code comments to understand the printing logic!
For .NET 8+ Blazor Server you must use Interactive Server render mode, so add these settings:
@page "/"
@rendermode InteractiveServer
@inject JSPrintManager JSPrintManager
@page "/" @inject JSPrintManager JSPrintManager <div> <strong>JSPM </strong><span>WebSocket Status </span> @if (JSPrintManager.Status == JSPMWSStatus.Open) { <span class="badge badge-success"> <i class="fa fa-check" /> Open </span> } else if (JSPrintManager.Status == JSPMWSStatus.Closed) { <span class="badge badge-danger"> <i class="fa fa-exclamation-circle" /> Closed! </span> <div> <strong>JSPrintManager (JSPM) App</strong> is not installed or not running! <a href="https://neodynamic.com/downloads/jspm" target="_blank">Download JSPM Client App...</a> </div> } else if (JSPrintManager.Status == JSPMWSStatus.Blocked) { <span class="badge badge-warning"> <i class="fa fa-times-circle" /> This Website is Blocked! </span> } else if (JSPrintManager.Status == JSPMWSStatus.WaitingForUserResponse) { <span class="badge badge-warning"> <i class="fa fa-user-circle" /> Waiting for user response... </span> } </div> @if (JSPrintManager.Status == JSPMWSStatus.Open) { @if (JSPrintManager.Printers == null) { <hr /> <div class="spinner-border text-info" role="status"> <span class="sr-only">Please wait...</span> </div> <strong><em>Getting local printers...</em></strong> } else { <div> <h1>Print Datamax DPL commands from Blazor</h1> <hr /> <EditForm Model="@MyPrinter"> <div class="form-check"> <InputCheckbox class="form-check-input" @bind-Value="UseDefaultPrinter" />Print to <strong>Default Printer?</strong><br /> </div> <p>or...</p> <p>Select an <strong>Installed Printer</strong>:</p> <InputSelect @bind-Value="MyPrinter.PrinterName" class="form-control form-control-sm"> @foreach (var p in JSPrintManager.Printers) { <option value="@p">@p</option> } </InputSelect> </EditForm> <br /><br /> <input type="button" value="Print Now..." @onclick="DoPrint" /> </div> } } @code { // An Installed Printer instance private InstalledPrinter MyPrinter { get; set; } = new(); // Use default printer? private bool UseDefaultPrinter = false; // Printing... private void DoPrint() { // Status = Open means that JSPM Client App is up and running! if (JSPrintManager.Status == JSPMWSStatus.Open) { // Create a ClientPrintJob var cpj = new ClientPrintJob(); // Set target Printer cpj.ClientPrinter = UseDefaultPrinter ? new DefaultPrinter() : MyPrinter; // Create Zebra ZPL commands for sample label var cmds = ""; cmds += (char)0x02 + "L" + (char)0x0d; cmds += "H07" + (char)0x0d; cmds += "D11" + (char)0x0d; cmds += "191100801000025"; cmds += "10K OHM 1/4 WATT"; cmds += (char)0x0d; cmds += "1a6210000000050"; cmds += "590"; cmds += "PCS" + (char)0x0d; cmds += "E" + (char)0x0d; // Set the RAW commands to send to the printer... cpj.PrinterCommands = cmds; // PRINT IT!!! JSPrintManager.SendClientPrintJob(cpj); } } protected override void OnAfterRender(bool firstRender) { if (firstRender) { // Handle OnGetPrinters event... JSPrintManager.OnGetPrinters += () => { if (JSPrintManager.Printers != null && JSPrintManager.Printers.Length > 0) { // Display installed printers... StateHasChanged(); } else { Console.WriteLine("No printers found..."); } }; // Handle OnStatusChanged event to detect any WSS status change JSPrintManager.OnStatusChanged += () => { StateHasChanged(); // Status = Open means that JSPM Client App is up and running! if (JSPrintManager.Status == JSPMWSStatus.Open) { //Try getting local printers... JSPrintManager.TryGetPrinters(); } }; // Start WebSocket comm JSPrintManager.Start(); } base.OnAfterRender(firstRender); } }
- That's it! Run your website and test it. Click on Print Now... to print the DPL Commands without print dialog. You can print it to the Default client printer or you can get a list of the installed printers available at the client machine.
NOTE You can also print directly to any LPT Parallel Port, RS232 Serial Port or IP/Ethernet Printer although these scenarios have not been considered in this article for simplicity. For further details on those scenarios, please contact our tech support.
