How to create and print Avery address labels with Postnet barcode images in Crystal Reports for .NET Windows Forms
Product Barcode Professional for Windows Forms Published 01/12/2007 Updated 01/12/2007
Requirements
Neodynamic Barcode Professional 2.5 (or greater) for Windows Forms (WinControl)
Crystal Reports for .NET (any version)
Microsoft .NET Framework (any version)
Microsoft Visual Studio .NET (any version)
In the following Step-By-Step Guide we're going to create a Windows Application which includes a CR report for Avery address labels including Postnet barcode images generated by Barcode Professional.
For simplicity, we're going to use an XML file as the Data Source for our CR report. This XML file, available for downloading at the end of this guide, includes information of employees generated from Microsoft's AdventureWorks database sample.
Note: This guide was made using Visual Studio 2005 but you can use any other version of it needing in some cases minor changes.
Follow these steps:
- Open your .NET development tool we're going to use Microsoft Visual Studio .NET and create a new Windows Application.
- IMPORTE NOTE:
This Guide uses an XML Schema (XSD files) as data source for the report. Please note that this XML Schema will only be used to design the report in the Crystal Reports Designer.
You can easily generate an XML Schema using an ADO.NET DataSet object. This object has the WriteXmlSchema() method that creates an XML Schema file for you.
So, if you need to create a report for a Table in a SQL Server Database, you can create a DataSet object for that Table and then call the WriteXmlSchema() method to get the XML Schema file associated to it.
However, in this sample demo we're going to use an XML file instead of a SQL Server Database for simplicity only.
REMEMBER that this is required to DESIGN the reports. Once created the report you won't need it at RUNTIME when you deploy your application.
For sample demos using Typed DataSet or SQL Stored Procedures as Data Sources please refer to the following Guides instead: - Add to the project the XML file called AdventureWorksEmployees.xml (you'll find it at the end of this guide ready for downloading)
- With this file opened, go to the XML menu and click on Create Schema.
VS.NET will create an XML Schema file called AdventureWorksEmployees.xsd. You'll find it in the Solution Explorer.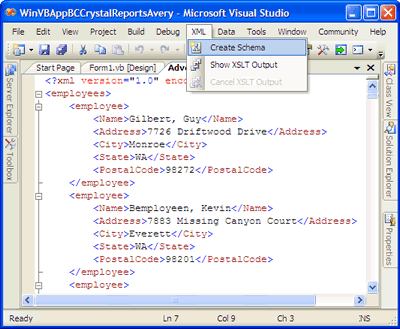
Remember that this file only will be use to design the report. - Once we have the XML Schema file, we'll need to modify it and add a NEW element that will represent our barcode images. To do this, double-click on the AdventureWorksEmployees.xsd and add a new element whose name will be BarcodeImage and whose type will be base64Binary as is shown in the following figure:
After that, save the XML Schema file!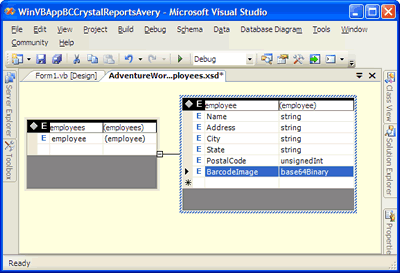
- Now it's time to create our CR report.
- Right-click on the project and go to Add/Add New Item.
- Select Crystal Report in the list and name it as AveryMailLabels.rpt
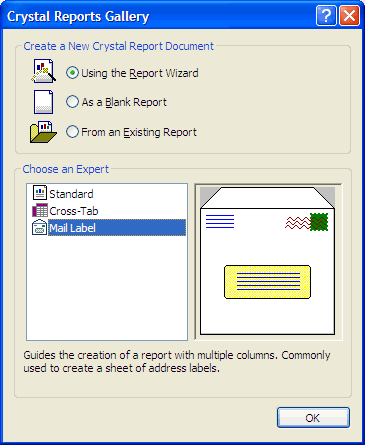
- In the Crystal Reports Gallery dialog box, select Mail Label and click on OK button as is shown in the following figure:
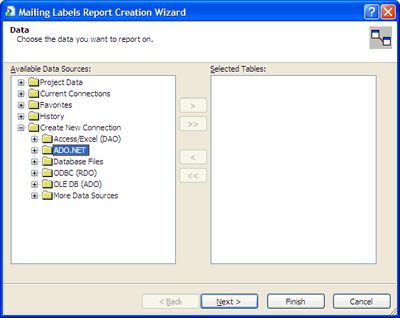
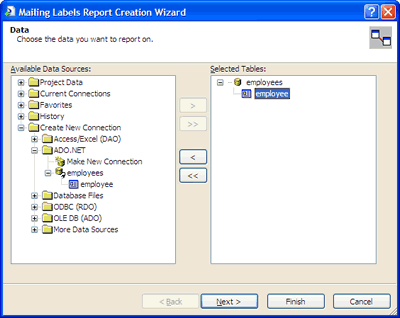
- The next step is to set the Data Source for the report. On the Wizard dialog box, click on Create New Connection > ADO.NET. In that moment a dialog box will ask you for a file. Specify the AdventureWorksEmployees.xsd file in the XML File Path textbox.
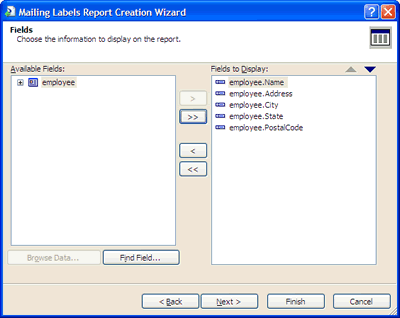
- Choose the fields to display on the report as is shown in the following figure:
- Now, choose the Avery label type. In this case we will choose "Address (Avery 5160)".
Click on Finish button to close the Wizard.
For more information about all Avery labels provided by Crystal Report as well as other useful data associated to each of them, see the following table:
The Mail Label Wizard configures the report according to the Avery Label you have selected.Avery Labels Type Labels Size Labels per Sheet Return Address (Avery 5267) 1/2" x 1-3/4" 80 Address (Avery 5160) 1" x 2-5/8" 30 Address (Avery 5260) 1" X 2-5/8" 30 Address (Avery 5161) 1" X 4" 20 Address (Avery 5261) 1" X 4" 20 Address (Avery 5162) 1-1/3" X 4" 14 Address (Avery 5262) 1-1/3" X 4" 14 Address/Shipping (Avery 5163) 2" X 4" 10 Address/Shipping (Avery 5164) 3-1/3" X 4" 6 Clear Address (Avery 5660) 1" X 2-3/4" 30 Clear Address (Avery 5662) 1-1/3" X 4-1/8" 14 Clear Address (Avery 5663) 2" X 4-1/8" 10 Full Sheet (Avery 5165) 8-1/2" X 11" 1 File Folder (Avery 5266) 2/3" X 3-7/16" 30 3-1/2 Diskette (Avery 5196) 2-3/4" X 2-3/4" 9 3-1/2 Diskette - Red (Avery 5096) 3-1/2 Diskette - Blue (Avery 5896) 5-1/4 Diskette (Avery 5197) 12 5-1/4 Diskette - Red (Avery 5097) 5-1/4 Diskette - Blue (Avery 5897) Audio Cassette (Avery 5198) 1-5/8" X 3-1/2" 12 Video Cassette Face (Avery 5199) Video Cassette Spine Name Badge - Red (Avery 5095) 2-1/3" X 3-3/8" 8 Name Badge (Avery 5395) 2-1/3" X 3-3/8" 8 Name Badge - Blue (Avery 5895) 2-1/3" X 3-3/8" 8 Name Tag (Avery 5383) Name Tag - Blue (Avery 5883) Name Tag (Avery 5384) 3" X 4" 6 Rotary Index Card (Avery 5385) 2-1/6" X 4" 8 Rotary Index Card (Avery 5386) 3" X 5" 4 Index Card (Avery 5388) Index/Post Card (Avery 5389) 4" X 6" 2 Round (Avery 5294) 2-1/2" Diameter 12
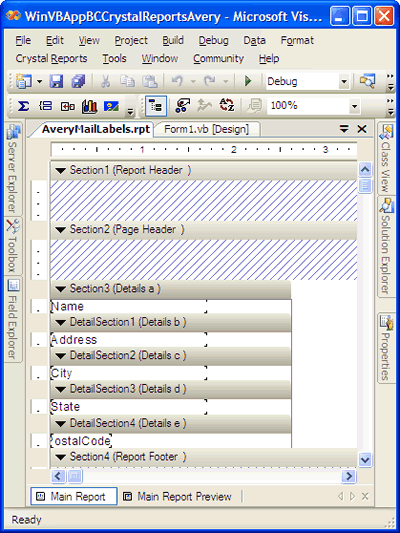
- Now, it's time to design the report. Drag & drop the fields as is show in the following figures:
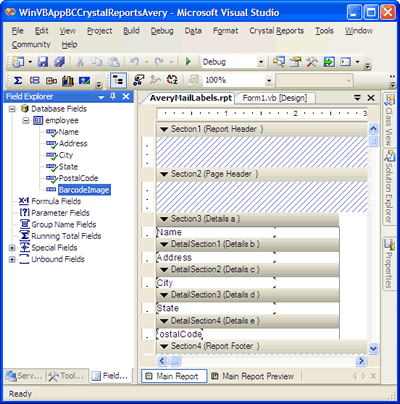
IMPORTANT: right-click on the BarcodeImage Blod field, select Format and check Can Grow!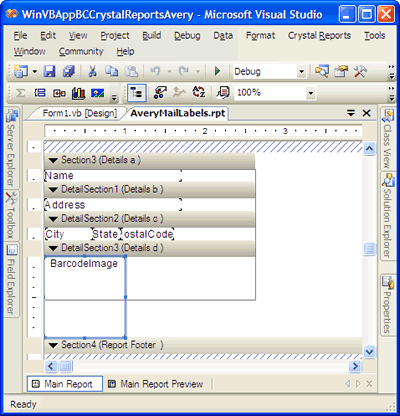
Click OK. Save the report and close it.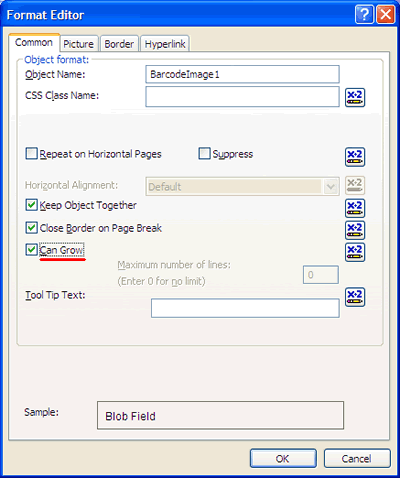
- Open your Windows Forms at design time and drag & drop a CrystalReportViewer control onto it. Set its Dock property to Fill and the DiplayGroupTree to False.
- Open the Solution Explorer window and add a reference to the Neodynamic.WinControls.BarcodeProfessional.dll assembly. We're going to use Barcode Professional as a component library.
- In the code-behind class of the Form, add the following namespace reference:
VB
Imports Neodynamic.WinControls.BarcodeProfessionalC#
using Neodynamic.WinControls.BarcodeProfessional; - Finally, write the following code in the Form1_Load event procedure:
VB
'Create a DataSet from the XML file
'REMEMBER to copy the XML file in the same location of the EXE Program
Dim xmlFile As String = System.IO.Directory.GetCurrentDirectory() & "\AdventureWorksEmployees.xml"
Dim ds As New DataSet
ds.ReadXml(xmlFile)
'The XML File with the data DOES NOT include
'the BarcodeImage "column" or element we've included
'in the XML Schema file.
'So, create the BarcodeImage column
'WARNING: you must name it as you did in the XML Schema
Dim dc As DataColumn = New DataColumn("BarcodeImage", GetType(Byte()))
'Add the BarcodeImage column to the DataTable
ds.Tables(0).Columns.Add(dc)
'Create a BarcodeProfessional object to fill
'the BarcodeImage column
Dim bc As BarcodeProfessional = New BarcodeProfessional
bc.Symbology = Symbology.Postnet
bc.PostnetHeightShortBar = 0.06F 'Set 5 if you use Barcode Professional 2.5
bc.PostnetHeightTallBar = 0.135F 'Set 12 if you use Barcode Professional 2.5
bc.QuietZoneWidth = 0
bc.AddChecksum = False
bc.DisplayCode = False
bc.BarWidth = 0.02F 'Set 2 if you use Barcode Professional 2.5
bc.BarRatio = 1
bc.Text = ""
'Now, generate and fill barcode images
For Each dr As DataRow In ds.Tables(0).Rows
'We're going to encode the PostalCode column
bc.Code = CType(dr("PostalCode"), String)
dr("BarcodeImage") = bc.GetBarcodeImage(System.Drawing.Imaging.ImageFormat.Png)
Next
'Create an AveryMailLabels report object
'and set its data source with the DataSet
Dim report As AveryMailLabels = New AveryMailLabels
report.SetDataSource(ds)
'Show it!
CrystalReportViewer1.ReportSource = report
C#
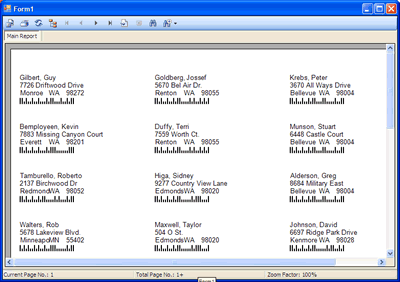
//Create a DataSet from the XML file //REMEMBER to copy the XML file in the same location of the EXE Program string xmlFile = System.IO.Directory.GetCurrentDirectory() + "\\AdventureWorksEmployees.xml"; DataSet ds = new DataSet(); ds.ReadXml(xmlFile); //The XML File with the data DOES NOT include //the BarcodeImage "column" or element we've included //in the XML Schema file. //So, create the BarcodeImage column //WARNING: you must name it as you did in the XML Schema DataColumn dc = new DataColumn("BarcodeImage", typeof(byte[])); //Add the BarcodeImage column to the DataTable ds.Tables[0].Columns.Add(dc); //Create a BarcodeProfessional object to fill //the BarcodeImage column BarcodeProfessional bc = new BarcodeProfessional(); bc.Symbology = Symbology.Postnet; bc.PostnetHeightShortBar = 0.06f; //Set 5 if you use Barcode Professional 2.5 bc.PostnetHeightTallBar = 0.135f; //Set 12 if you use Barcode Professional 2.5 bc.QuietZoneWidth = 0; bc.AddChecksum = false; bc.DisplayCode = false; bc.BarWidth = 0.02f; //Set 2 if you use Barcode Professional 2.5 bc.BarRatio = 1; bc.Text = ""; //Now, generate and fill barcode images foreach (DataRow dr in ds.Tables[0].Rows) { //We're going to encode the PostalCode column bc.Code = (string)dr["PostalCode"]; dr["BarcodeImage"] = bc.GetBarcodeImage(System.Drawing.Imaging.ImageFormat.Png); } //Create a AveryMailLabels report object //and set its data source with the DataSet AveryMailLabels report = new AveryMailLabels(); report.SetDataSource(ds); //Show it! crystalReportViewer1.ReportSource = report; - That's it. Build the Windows Application and run it.
Sample Files Download
- AdventureWorksEmployees.xml (45 KB)
- AdventureWorksEmployees.xsd (1 KB)